Feeds:
Posts
Comments

I’d have to say that Captain Captivate somewhat of a design snob.

I really do look at kerning and tracking of type in layouts, and it makes me cringe to see that offending widowed or orphaned text in print and on the web. So thbluecaptione first time I used Captivate, or at the time RoboDemo, you could imagine shock at the first Text Caption that I created. You know the one I’m talking about – the Blue default caption with about zero margins, and text jammed up on the sides. I thought that this cannot be happening. There was no property box to change the margins and nothing in the Text Caption properties dialog box either. Well, what’s driving the margins? There has to be something.

By poking around the Captions Gallery, I eventually I found the elusive .FCM file. If you want to check it out for yourself – the Adobe Captivate 3 Captions gallery can be found here:

C:\Program Files\Adobe\Adobe Captivate 3\Gallery\Captions

Inside the Captions Gallery you will find a unique .FCM file for each caption .BMP file. That’s right – you need a unique .FCM file for each caption in a caption style set. So the AdobeRed1.BMP file will have an AdobeRed.FCM file that controls it.

To crack open the .FCM file you’ll need to associate the file type with Windows Notepad.  An .FCM file is nothing more than a plain text file so Notepad is the easiest application to use. If you double click the .FCM file to try to open it up Widows will ask you if you would like to choose a program to associate with it – at that point go with Notepad.

Upon further investigation, I found out the following about the contents of an .FCM file:

  1. Contains Text Caption margin values in pixels (That’s what I was looking for!)
  2. Tells Captivate if the caption has a tail – either true or false
  3. If there is a caption tail – indicates which direction it is pointed indicated by top, left, right and bottom
  4. The distance from the tip of the tail to the corner of the caption in pixels

Here’s an example:

Left Margin=10
Right Margin=10
Top Margin=10
Bottom Margin=10

[Hotspot]
Enabled=true
Corner=left,bottom
MarginX=0
MarginY=24

All you have to do is modify the margin values for each caption in a style set, and you’re off and running. Keep in mind that your artwork is going to dictate the how high the margin value are. Take a look at this image:
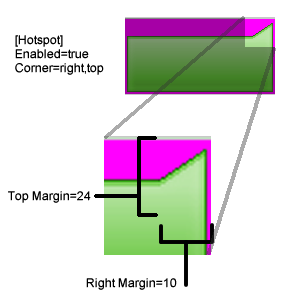
The .FCM file controls the margins form the edge of the artwork.

The .FCM file controls the margins from the edge of the artwork.

You won’t have any problems with the “rectangle” captions. It’s the captions with the tail that you’ll need to make a measurement with.

A couple of notes moving forward:

  1. Once you apply a caption in a Captivate movie the .FCM values are embedded in the file. Make sure that you make your margin changes before you implement the caption in the Captivate movie. You can flush the values out in the Captivate preferences, but this is not recommended.
  2. Where did the .FCM file name come from? .FCM is short for FlashCam – the application that was the precursor for RoboDemo which then became Captivate
  3. If you need to change the font styling – check out the Fonts.ini file in the Captivate Gallery. This file drives the initial formatting of the Text Caption fonts.

Very good! I can tell your Captivate Caption Text is going to look much better in future projects.

Add to FacebookAdd to DiggAdd to Del.icio.usAdd to StumbleuponAdd to RedditAdd to BlinklistAdd to Ma.gnoliaAdd to TechnoratiAdd to FurlAdd to Newsvine

Most Captivate developers encounter a Highlight box for the first time as part of a Demonstration Recording. This faint flash of color to draw the user’s attention is great for simulation recordings, but there is another way that you can take advantage of this Captivate object.

Here’s a dirty little secret: a Highlight box can be used to cover up square areas of your screen temporarily or even permanently.

Thanks Development Team!

A good example would be an application that has yet to be rolled-out, and you have been tasked with building an eLearning module for that app. (I’m sure I just heard some groans.) Guaranteed that some system function will be stripped away before an application is released.

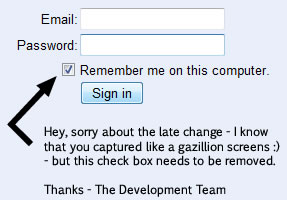
Let’s say that the development team decides to remove a check box from the application, and you have 80 background screens in Captivate with that check box. Now, that’s a problem. Along comes the Highlight Box to save the day.

Here’s an easy way to get rid of a that problematic interface element:

1. Identify object or area to cover.
In this case – the area is the check box and label “Remember me on this computer.” The screen capture is part of an image on the slide background.  For the best results, the new Highlight Box must be in the layer above your background.

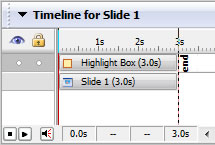
The highlight box is above the slide background.

The highlight box will be above the slide background.

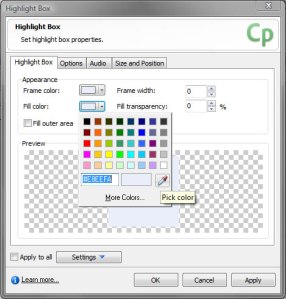
Select the Pick color tool and click your application background color for a perfect match.

Select the Pick color tool and click your application background color for a perfect match.

2. Create the Highlight Box.
From the Main Menu select Insert > Highlight Box (SHIFT+CTRL+L)

Set the following attributes in the New Highlight Box window :

  • Frame color: White (This can be any color!)
  • Fill Color: Match your application background color with the eyedropper tool.
  • Frame Width: 0
  • Fill Transparency: 0%
  • The Fill outer area box is unchecked

Select the Options tab and set these values:

  • In the Timing Area set these values: Display for: rest of slide – Appear after 0.0 seconds.
  • In the Transition Area set the Effect to no transition.

Click the OK button.

3. In the timeline, click and drag the new Highlight Box above the Background Layer.
You can never have visual content below the Slide Background – that’s impossible in Captivate.

4. Resize the Highlight Box and cover the checkbox and label.
You may have to lock a few layers down to do this depending upon the complexity of your Captivate slide.

5. Select Preview > Next 5 slides from the Captivate Tool Bar.

Good-bye offending interface element! Remember this techniques works well in situations that a visual element may or may not be a part of the final movie. Those developers may come back and say, “Hey – can you put that check-box back?.”

A couple quick notes:

  • You can always remove the Highlight Box cover if functionality returns to the application you are recording.
  • You can copy and paste the Highlight Box to other screens if needed.
  • Right-click the Highlight Box and select Merge to Background if you want this to be a permanent change.

I have been using this same technique for years and it has never failed me. Now you have one more tool in your Captivate tool belt.

Add to FacebookAdd to DiggAdd to Del.icio.usAdd to StumbleuponAdd to RedditAdd to BlinklistAdd to Ma.gnoliaAdd to TechnoratiAdd to FurlAdd to Newsvine

I had a wonderful group at my presentation on Captivate 3. Thanks to
everyone who attended!

The Captain was lucky enough to sit in on RJ Jacquez’s presentation on the upcoming features of Captivate 4 at the Adobe Learning Summit on Monday. He called it “Captivate Next” in the presentation, but it was apparent by the opening screen that it may be Captivate version 4.

The session was billed as a sneak peak on Adobe eLearning technologies, but it was primarily an overview of Captivate 4 – which was just fine by me. There were a few announcements around Adobe tools including an eLearning suite to be released sometime in 2009 that includes Photoshop CS4, Flash CS4, Acrobat Professional 9 and Adobe Device Central integration with Captivate. In addition, RJ mentioned that a Macintosh version of Captivate is in the works – no word on a release date.

Here are the new features that were revealed:

Captivate File Set Up

  • Create a new Mobile Captivate file in Adobe Device Central
    • Preview your Captivate application on devices that support FlashLite 3.0 and 3.1
    • Simulate lighting conditions for the mobile device in Adobe Device Central

Recording Features

  • Automatic panning that will follow your mouse
  • New recording interface
  • New “pre-recording” panel

Development Features

  • Inline text editing with captions! No text tool yet, but it’s close enough.
  • Call Captivate variables to control the environment
    • Turn the navigation bar on or off
    • Turn the visibility of elements on or off – like a caption
  • Use custom variables to store and display any information you want
    • Variable values are displayed visually by using $$variablename$$ in a caption. This can be used to capture a student’s $$firstname$$ or $$lastname$$ values
    • Static variables can also be used in a Captivate language RDL file. This will allow you to customize the automatic captions that are created during a recording
  • Captivate Widgets
    • Pre-built Flash components that can communicate with the Captivate development environment
    • ActionScript 3 code is provided so you can create you own Widgets
    • Widgets revealed include:
      • Text entry box that captures a variable value
      • Student certificate that has the course name, score and student name
      • Buttons that will display for rest of movie that will turn off the next and back buttons depending if you are on the first or last slide
    • Download widgets from Adobe.com
    • Use existing widget FLA files to modify or make your own custom widgets
    • Build a quiz widget that can get reported to an LMS
  • Create multiple Captivate Actions on one slide

Publishing

  • Export your SWF file as either ActionScript 2 or ActionScript 3 based code
  • Easier way for creating an Image Slide Show
  • Output directly to a PDF document – Acrobat 9 Reader only
  • Create one SWF file that embeds all the media including the skin, SWF videos, and quiz question elements
  • Create a Table of Contents – the Menu option is gone
    • Use the TOC for one or more Captivate movies
    • Multiple Captivate SWF movies will need to use the new Aggregator feature to “package” everything together
    • Search your Captivate movie through the TOC
  • Output to Flashplayer 7, 8, 9 and now 10

Tool Integration and Workflow

  • Captivate files and templates are now rendered in Adobe Bridge
  • Import Photoshop files into Captivate
    • You can either flatten the image or retain the individual layers
    • The PSD file will take each layer and convert it into a PNG
    • Each PSD layer becomes a separate Captivate layer on the timeline. This will make it really easy to build animations and screen builds in Captivate.
  • Create Captivate templates that use placeholders for graphics, captions, videos, and slide types like a quiz question, or recording slide.
  • Round trip editing with PowerPoint content in Captivate via a dynamic link
  • Adobe Air Review Application
    • Allows you to send a reviewer an Air application that will play the Captivate movie
    • Reviewer makes comments and e-mails them back to the Captivate developer, or uploads them to a development server
    • Comments import back into Captivate
    • Changes can be made, and comments sent back to the reviewer

Wow! What a list.

The Captivate development team has been busy. There are some real substantial changes to Captivate that will really speed up development time, and create an integrated workflow with other Adobe tools. This is going to really be a worthy upgrade to the product, and the Captain cannot wait to see more.

It’s not all work for the Captain.

After practicing our presentations at the Adobe Learning Summit the speakers made our way over to Gorden Biersch for some food, drinks and fun. It was nice to meet the marketing power behind Connect and other Adobe learning products.

The files from my presentation can be found here:
Captivate 3 Work Flow Presentation Files

Why are you a problem in Captivate 3?

Why are you a problem in Captivate 3?

This is in response to an earlier post about .FLV video in Captivate 3. I wanted to share with you a post that was made up on a private Captivate board by Jonathan Turkle, VP at Envisiontel. I think this confirms my suspicions about large amounts of Flash video.

I have had several occasions where customers have asked me to take a series of  20 .flv videos and turn it into DVD style on-line experience with a menu of various chapters or video modules that the user can be selected form different slides in a non-linear random access manner. When the video slide is finished playing the viewer is taken back to a main menu or home screen

After a great deal of time exploring this issue in Captivate 3, I learned that Captivate is designed to cache embedded movies in slides in a linear fashion in the order or the slides in the project. This means that beyond slide four or five the user must wait an interminable time for the video to load because it must cache the previous slide videos first. Is it not possible to have Captivate call an .flv slide videos without waiting for all the other slide videos to cache first?

The only work around to eliminate the extremely long video caching process has been to break up what should have been one Captivate project in to four Captivate projects with no more than 5 video slides in the project.

As I dig deeper into this topic it seems that large amounts of video in Captivate is a problem – hopefully this is addressed with any future versions of Captivate.

There have also been comments by many people about not even being able to play back .FLV video at all. This might be a server MIME type issue, but I’m looking for confirmation on that.

So it looks like if you are doing a video intensive project – stream your video. This looks like the only solution a this point. Now I have yet to speak with anyone who has implemented streaming video in Captivate 3, so if you have tested these waters please comment.

The Captain will continue to investigate this problem!

I just returned from a fantastic two day Captivate on-site class with Flextronics corporation in Denver, CO. There were students in from all over the country – Washington, Ohio, New Jersey and Illinois.

Denver is such an beautiful place – I can see why so many people migrate to the area. I was able to see the Rockies from the training room – now that’s what i call a view.

Here are some pictures from the training.

This past Friday was the last day of the Captivate Masters Week in Charlotte, NC. What an amazing class! There were students in from as far as Sweden, and India – and a great mix of corporations and higher education institutions. I want to thank all of my Captivate Masters for a great week, and I wish you all the best.

The next Captivate Masters week is scheduled for April 2009 in NYC. There are no firm dates yet, but I will post them when they become available. Here are a few pictures from last week:

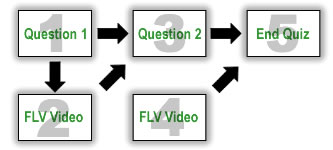
A fellow Captivate user was having problems with FLV video playing correctly on the web. The situation involved FLV videos appearing after a wrong answer in a captivate quiz. The set-up of the file was as follows:

Video Feedback Slide Flow

Video Feedback Slide Flow

What a great interaction: The user would answer the quiz question and if there was wrong answer feedback – they would see a video. If the answer was correct they would continue to the next quiz question. Each of the videos were set to Progressive download, and all seemed well while testing on the local machine. (I’m sure many of you can see where this is going already.) Then once the file was uploaded to the LMS – users experienced a system freeze, or the video would not play. They tried everything to figure this one out – changing the order of the videos in the slides, pre-loading videos, and even using javascript to open the video in a new browser window. etc. Nothing really worked they way they wanted it to, and when videos where placed in sequential slides – the problem was worse.

This is not the first time that I have encountered users having problems with FLV videos in Captivate 3. Here are some other issues I have seen in message boards:

  • I have 20 FLV videos that are 2-3 minutes long – one video per slide. After about the 3rd or 4th video they stop playing.
  • The audio is not working correctly, or the audio in the video plays too soon
  • The videos just don’t play – period.

Wow. What a let down to know that you can put great looking video in a Captivate presentation, but then when the testing starts – it all heads south fast.

I’ve come to the conclusion that there may be an issue with the way Captivate is unloading the videos from memory – or better yet – Captivate is not unloading the videos from memory at all. I have yet to run across problems with streaming FLV’s, but most Captivate users don’t have the luxury of a streaming server – so you don’t hear about streaming server issues too often.

If you have had any problems using FLV videos in Captivate 3 – I would love to hear your story. Please make comments here about your video experience.

The Captain will be speaking at the Adobe Learning Summit in San Jose on November 10, 2008. Don’t bother looking for me in my costume – I’ll be in my civilian clothes talking about Captivate 3 Workflow Strategies.

I’m looking forward to this event. It will be my first eLearning Summit, and DevLearn conference. There will be tons of sessions on Captivate, Flash, and mobile learning. This looks to be a great conference.

Adobe eLearning Summit